


The MRCOOL DIY Mini Split system offers a straightforward installation experience. Included are pre-charged indoor and outdoor units, communication and power cables, and a 25-foot Quick Connect line for single-zone setups, with 16ft,25ft ,35ft and 50ft to choose from multi-zone set up, eliminating the need for special tools or professional skills. Simply mount the indoor unit, connect to the outdoor unit using the Quick Connect line, and establish a secure outdoor location. Once hooked up electrically, the system is ready to operate. Instructions, tips, and videos detailing each step of the process are conveniently provided below.
MRCOOL DIY Mini Split Components

This photo displays the components included in your MRCOOL DIY kit
Indoor Unit: The MRCOOL DIY Mini Split air handler is a sleek device that distributes conditioned air efficiently while maintaining a quiet operation. It features a washable air filter, customizable airflow, and auto-swing louvers for superior air quality.
Outdoor Unit: The outdoor condenser unit of the MRCOOL DIY Mini Split system expels indoor heat, providing energy-efficient cooling and heating. Built to withstand diverse weather, it operates quietly due to its noise reduction technology.
Remote Control: The user-friendly MRCOOL DIY Mini Split remote allows easy control of temperature, fan speed, and modes from anywhere in the room. A built-in timer caters to your schedule and lifestyle.
Pre-charged Refrigerant Lines: These factory-charged lines included in the MRCOOL DIY Mini Split system simplify installation and enhance the system's efficiency and performance.
Quick Connect System: This innovative feature facilitates a secure connection between the indoor and outdoor units, enabling easy installation even for DIY beginners.
Wi-Fi Capability & Smart Home Integration: MRCOOL DIY Mini Split system's Wi-Fi feature and compatibility with smart home platforms allow remote control of your system via smartphone or voice commands. This integration ensures comfort and energy efficiency at your convenience.
How Can You Install a Mini Split?
Watch our video to uncover the possibilities of DIY HVAC installation
The MRCOOL DIY Mini Split system provides a practical option for a DIY installation. Its innovative design includes pre-charged refrigerant lines and a Quick Connect system, simplifying the process and eliminating the need for professional help. Even those with limited DIY experience can manage the installation, thanks to the user-friendly setup.
Professional Installation Cost
If you opt to hire a professional for your MRCOOL DIY mini split installation, costs may rise, typically ranging from $1000 to $2,000 or more, depending on the job's complexity and your location. To get a sample quote for a licensed professional handyman or electrician to install your MRCOOL mini split system, you may search on Angi, a contractor to help you with your installation. While it might increase initial costs, a professional installation can provide peace of mind, ensure correct setup, and possibly extend your unit's lifespan. Professionals can also guide you through unit operation and maintenance for optimal efficiency. Remember, though, the MRCOOL system is designed for DIY installation, so feel confident to handle the process if you're comfortable with basic DIY tasks.
Starting Your Installation
Before MRCOOL DIY Mini Split Installation: it's essential to thoroughly evaluate your space and consider key factors like room size, insulation quality, and sun exposure. These elements significantly influence your system's performance and understanding them optimizes installation, efficiency, and system lifespan.
Choosing Indoor Unit Location: Use the following guidelines to help you select an appropriate location.
- Ensure good air circulation and convenient drainage.
- Ensure minimal noise disturbance.
- Place on a firm, vibration-free spot that can support the unit's weight.
- Keep it at least 1 meter away from other electronic devices.
- Avoid near heat sources, steam, combustible gas, or flammable items.
- Ensure there are no obstructions that could hinder air circulation.
Indoor Unit Clearances: ensure proper distance from walls, ceiling, and floor when mounting unit.

- Minimum ceiling clearance: 5.9 in.
- Side clearance: 4.75 in.
- For ceilings >9 ft., height from floor: 90.55 in.
- For ceilings <9 ft., height from floor: 78.55 in.
Choosing Outdoor Unit Location: Use the following guidelines to help you select an appropriate location.
- Ensure good air circulation and ventilation.
- Avoid areas near obstacles, public streets, crowded spaces, animals, plants, or combustible gas sources.
- Avoid locations exposed to large amounts of dust, salty air, or excessive forced water.
- Protect from prolonged exposure to sunlight, rain, and take measures to prevent ice buildup and coil damage in snowy areas.
Outdoor Unit Clearances: ensure proper distance between the back of the unit and wall when installing the outdoor unit.

- Clearance above unit: 24 in.
- Clearance in front: 79 in.
- Left side clearance: 12 in.
- Right side clearance: 24 in.
- Back clearance from the wall: 12 in if ground-installed, 6 in if bracket-installed.
Prepare your tools: Begin the MRCOOL DIY mini split installation by gathering tools such as a stud finder, level, drill, 3 1/2-inch hole saw, and adjustable wrench. Use the stud finder and level for proper indoor unit placement. The drill and hole saw make room for refrigerant lines, and the wrench secures components. Always adhere to the manufacturer's guidelines to ensure a safe, efficient install.
Electrical Considerations
Understanding Power Requirements: In the installation process of a MRCOOL DIY Mini Split, it's crucial to ensure that your home's electrical system meets the unit's power requirements. These requirements vary between 110-240 volts depending on the specific model of the mini split. The MRCOOL specification sheet provides this detailed information. If these power requirements are not met, it could potentially lead to system overloads or electrical mishaps, impacting the overall performance and safety of your mini split system.
MRCOOL DIY MINI SPLIT: Single Zone Specification Sheet

MRCOOL DIY MINI SPLIT: Multi zone Specification Sheet

Decoding the MRCOOL Wiring Diagram: Wiring is key in mini split setup, with each wire color having a specific function, like red for power, black for neutral, green for ground, etc. Incorrect wiring can cause issues or damage. Adherence to local and national electrical codes is necessary and installation should be done by a licensed electrician. Remember, your mini split's wire colors might differ from earlier models, series or common conventions. Follow the wiring diagrams in your manual.
Managing Your Mini Split Communication Wire: The communication wire in your MRCOOL DIY mini split plays a significant role in efficient communication between the indoor and outdoor units of the system. Proper installation is key to prevent system performance disruption. Engage a certified electrician for assured and efficient setup.
Step-by-step MRCOOL DIY installation guide
Begin the Installation: Once your electrical requirements are in order, you have your necessary tools, and you have selected the optimal location for both the indoor and outdoor units, it's time to start the actual installation of your MRCOOL DIY mini split system.
Installing the Mounting Plate:
- Using a level, mark the location for the mounting plate on the wall.
- Drill the holes for the mounting plate screws and the 3.5-inch hole for the conduit that will contain the power cable, communication wire, and copper lines. Make sure that this hole angles slightly downward towards the exterior for proper drainage.
- Affix the mounting plate onto the wall with screws.
Mounting the Indoor Unit:
- Run the electrical wires and refrigerant lines through the 3.5-inch hole you drilled and attach them to the indoor unit according to the MRCOOL wiring diagram.
- Attach the indoor unit to the mounting plate securely.
Installing the Outdoor Unit:
- Position the outdoor unit at the previously determined location, ensuring it's stable, level, and clear of any obstructions.
- Connect the refrigerant lines from the indoor unit to the outdoor unit using an adjustable wrench. Be careful not to overtighten these connections. Any excess lines can conveniently be coiled behind the condenser for neatness and safety.
- Follow the MRCOOL wiring diagram to connect the power cable and communication wire to the outdoor unit.
Checking and Sealing the System:
- Once all connections are secure, inspect your work to ensure all connections are correct and secure.
- Seal the 3.5-inch hole in the wall with waterproof sealant to prevent any water or insect ingress.
Powering Up:
- After everything is securely in place, restore the electrical power to the circuit and start your MRCOOL DIY Mini Split system.
- Check the system's operation to ensure it is running smoothly.
Remember, always refer to your MRCOOL DIY Mini Split system's manual for specific installation instructions and safety information. If you are uncomfortable with any part of the installation process, particularly the electrical work, it's best to hire a professional.
Useful MRCOOL Installation Videos
Watch this quick video for an easy MRCOOL DIY mini split single zone installation.
Watch this quick video for an easy MRCOOL DIY mini split multi- zone installation.
Watch this quick video for an easy MRCOOL DIY Ceiling Cassette installation.
Exploring DIY Mini Split Accessories
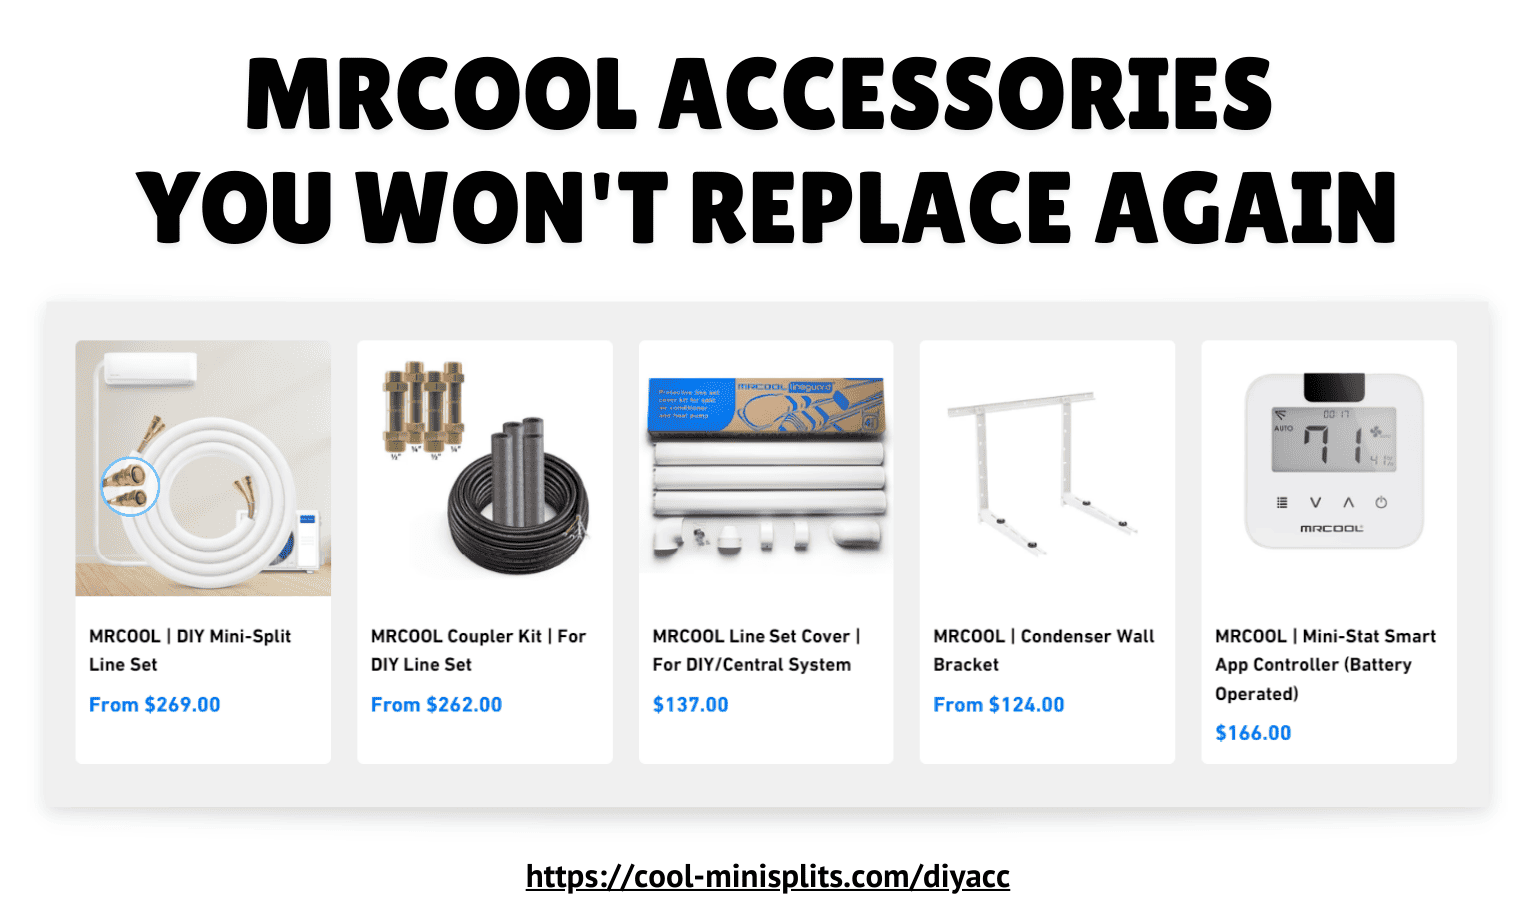
Enhance your MRCOOL installation with our range of DIY accessories. If you need to extend your system's reach, additional line sets and couplers can be used to connect up to 3 lines, reaching a maximum of 75ft. For a more polished look and secure setup, consider our line covers and wall mounts. These accessories not only beautify your space, but also add convenience and efficiency to your MRCOOL Mini Split system. Also, you can conveniently purchase the MRCOOL DIY accessories anytime!
Frequently Asked Questions (FAQs)
Q1: Does MRCOOL come with electrical wiring?
Yes, all MRCOOL DIY® kits include a 25ft DIYPRO™ communication cable.
Q2: Do you have installers? Where can I find a technician to work on my unit?
You can locate an installer using the map on our MRCOOL installer map website. If none are nearby, any HVAC professional can help.
Q3: What size electrical wire do I need for my unit?
The required wire gauge is stated in the unit's installation manual. Note: power cables for Mini Split aren't provided.
Q4: Do I have the latest Installation manual?
Manuals are updated frequently. Check the version date on our website for MRCOOL manuals to ensure yours is current.
Q5: What is the rule of thumb for mini split sizing?
Multiply the square footage covered by your indoor units by 20 to determine your BTU requirements.
Q6: What happens if you oversize a mini split?
An oversized mini split system could result in short cycling due to rapid heating or cooling.
Q7: How far off the wall should a mini split be?
A mini split air conditioner should typically be installed at least 12 inches (30 cm) away from the wall for optimal performance, and minimum 5 inches away. It's also should have 20 inches of overhead clearance. This is to ensure sufficient airflow around the unit and to facilitate maintenance work.
Q8: Should I leave my mini split on all the time?
Continuous operation of your mini split can lead to better efficiency and more consistent temperatures.
Q9: How many hours does it take to install a mini split?
Installation typically takes 4-6 hours, depending on the number of indoor units.
Q10: Do you have to pull a vacuum on a MRCOOL mini split?
No vacuuming is required as the system's lines come pre-charged.
Conclusion
In sum, the MRCOOL DIY Mini Split system provides a dependable, affordable heating and cooling solution. It simplifies DIY installation with its user-friendly features, negating the need for professionals and cutting costs.
The system's superior performance and energy efficiency are complemented by seamless smart home integration. It entails assessing your space, selecting appropriate unit locations, preparing tools, managing electrical requirements, and strictly following installation instructions for optimal operation and longevity.
If installation seems challenging, particularly electrical tasks, professional help is recommended. MRCOOL also provides various accessories to boost your system's utility and appearance, blending efficiency, smart tech, and easy installation for a convenient living experience.


